Rx Catch Can Install on Explorer Sport

JimiJak-
Awesome instructions...I also thank you.

Though I'm confused, which believe me isn't your fault.

On the clean side reroute, I thought Tracy said to use the stock barb closes to the air box? But you ended up tapping directly into the air box. Am I missing something?

BTW- NAPA has a two pack of the 5/8" cap. Part number 660-1696...
 
POPSTAGE2 said:
JimiJak-
Awesome instructions...I also thank you.

Though I'm confused, which believe me isn't your fault.

On the clean side reroute, I thought Tracy said to use the stock barb closes to the air box? But you ended up tapping directly into the air box. Am I missing something?

BTW- NAPA has a two pack of the 5/8" cap. Part number 660-1696...

No problem...that's why these write-ups are here!
There is no vacuum barb near the air box. The only one on the intake piping is where the clean side separator was already plugged in, prior to re-route. Tracy mentioned moving the line as close to the air box as possible. PainterPatt installed it just this side of the air box coupler at the start of the intake piping. Before I moved it, I talked to Tracy and he said as long as you have a good place to mount it, and stay on the clean side of the filter, the air box itself is better, since it will have even less vacuum effecting it there. The further away you can put it, the better. Tricky for the CAI guys.

You do bring up a good point though, something I forgot to mention. What Tracy had mentioned was for initial install, that YOU DO NOT HAVE TO TAP THE FRONT INTAKE PIPE when you're doing the evac line from the catch can. Rather than drilling the front pipe, you can CONNECT DIRECTLY TO THE VACUUM BARB THE CSS WAS USING FROM THE ORIGINAL INSTRUCTIONS.

Car quest takes good care of me, so sometimes I spend a little more over there. It all works out in the end, but thanks for the heads up! I have extras now. LOL

Thanks for the feedback!
 
Car quest takes good care of me, so sometimes I spend a little more over there. It all works out in the end, but thanks for the heads up! I have extras now. LOL

Thanks for the feedback!
[/quote]

Thanks for clarifying...that really does help! I reread what Tracy wrote and new I was missing something because I looked the Sport over last night and just couldn't see the nipple he was talkinh about.

Thats cool with the CarQuest folks...Just mentioned the NAPA number because I own and operate a NAPA store!

Thanks again,
Guy
 
Ok silly question, why can't we just use a separate air filter in the end of the clean side and have it to atmosphere? And not inside in the intake tubing at all? You would then be able to use the OEM port to supply vacuum to the RX and not have to drill. Even in the air box there will be some vacuum pulling on the other side of the RX if it was just to atmosphere then there would be none. Just curious.


Sent from my iPad using Tapatalk
 
ShoBoat said:
Ok silly question, why can't we just use a separate air filter in the end of the clean side and have it to atmosphere? And not inside in the intake tubing at all? You would then be able to use the OEM port to supply vacuum to the RX and not have to drill. Even in the air box there will be some vacuum pulling on the other side of the RX if it was just to atmosphere then there would be none. Just curious.


Sent from my iPad using Tapatalk

This has to be vented back into the engine per emissions regulations.


FYI That sensor in the air box is a thermistor that measures the intake air temp.
 
dalum said:
ShoBoat said:
Ok silly question, why can't we just use a separate air filter in the end of the clean side and have it to atmosphere? And not inside in the intake tubing at all? You would then be able to use the OEM port to supply vacuum to the RX and not have to drill. Even in the air box there will be some vacuum pulling on the other side of the RX if it was just to atmosphere then there would be none. Just curious.


Sent from my iPad using Tapatalk

This has to be vented back into the engine per emissions regulations.


FYI That sensor in the air box is a thermistor that measures the intake air temp.

Don't really see this suggested alteration as being much different than what many are doing with the BOV VTA ..... A thought ......

EPA will probably throw us  in jail anyway for the tuning mods  we do anyway  , especially running  " off road down pipes " ..... I say Poo on em .
 
SwampRat said:
Don't really see this suggested alteration as being much different than what many are doing with the BOV VTA ..... A thought ......

EPA will probably throw us  in jail anyway for the tuning mods  we do anyway  , especially running  " off road down pipes " ..... I say Poo on em .

VTA mod "should" just be venting "clean" pressurized air.  A lot of people sell "off road" air filters that take the place of the oil cap (Rx included).  This should technically work but I would be concerned with all of the  oil splashing up when switching between boost/nonboost clogging the filter media restricting air intake into the pcv system.
 
A couple thoughts:

Putting a filter on the end of the CSS:
- True there would be NO vacuum at the filter, plus it would save you from drilling a hole in your airbox.
- Michigan, and many others are NON-INSPECTION states...so I could really care less what the EPA thinks.
- My primary concern would be for any oil mixture to reach the filter. This would mean it could accumulate and potentially enter the engine bay, and I don't want oil in my engine bay. IF the Rx can is doing its job, and the flow is flowing in the correct direction with exception of momentary reversion during transition periods, THEN the CSS should be able to remove ALL of the oil, so it would never touch the filter.
- If all of the above is correct, and you don't live in an EPA inspection state, then putting a filter on the end of the CSS should work as a BETTER option than re-routing to the airbox.

TRACY; YOUR INPUT ON THIS IS GREATLY APPRECIATED


As far as comparing the venting the charge pipes to atmosphere VS. venting the CSS to atmosphere:
- with the OEM setup, the clean side is getting stuff dumped into it while under boost, BUT it doesn't make it all the way back up to the eBOV in the charge pipes because it has the CAC there to act as a catch can.  ...just a theory.
- When venting to air, the further you back up in the system to the source of the oil, the more oil you'll get.

Anyone else have any thoughts on why installing a small breather filter on the end of the CSS wouldn't work?
 
And your getting plenty of water and unburnt fuel it appears....similar to the EB's int he trucks. So it is working like it should.  WHats it smell like?
 
Tuner Boost said:
And your getting plenty of water and unburnt fuel it appears....similar to the EB's int he trucks. So it is working like it should.  WHats it smell like?

Smells more like gas than oil.
What are your thoughts on a breather filter on the css rather than routing it to the airbox?
...in a non EPA-inspection state.
 
Be aware, we are seeing more EB's filling the crankcase with fuel, and in almost every case this has been a failing seal on the HPDI pump (high pressure DI pump) so if your catching long term that same amount of fuel more than water and oil (let it settle a few days. Water will be on the bottom of the container, sulfuric acid next, then fuel and oil emulsified, then oil on the top layer (4 distinct layers will appear).  If your still getting more fuel than other stuff, then have the dealer check for it being the pump.

We have had several truck owners that after installing the RX system the dealers were able to determine the source of the fuel ingestion and fix the issue. One after 15 visits to the service department!

That mod is perfect JimiJak.  And as far as the "off road" breather ($69 form Ecoboost Power Parts) as long as there is NO MAF sensor, and only the IAC sensor shown anywhere in the pipe between the air box and the throttle body, an "off road only" non emissions compliant breather should work fine for those not minding vapors smelling in the engine compartment.

But I really like this solution better than any yet how JimiJak did this.


" VTA mod "should" just be venting "clean" pressurized air."

I have noticed that I do have a light oil mist that comes from the bov, especially on the fire wall side.
The hoses and tubing  have a light coating of oil on them.

2010 RCM non PP
K&N panel filter
sp534 @ 30
unleashed 93 performance+boost
more to come.....

 
Rx catchcan – Re-Location with Remote Drain
- It stays cooler, tucks out of the way, sits, lower, drains easier, and looks (almost) stock from above!!

...let's find out how:
Materials you will need -
x3 - pneumatic fittings - threaded hose barbs (metal) 1/4” NPT-Male / 3/8” hose barb
x1 - pneumatic fitting - connector (metal) 1/4” NPT-Double Female
x1 - 3/8” 90* Elbow
xSeveral feet of 3/8” PCV / Fuel Hose (most of which can be reclaimed and/or extended with butt connectors from original install if you rather)


After removing the front end, I started digging around...I quickly realized my initial plan to mount it F-150 style, in front of the radiator, was simply not going to happen. Which honestly, I was fine with, since I'm not big on robbing any air flow from the radiator or CAC. BUT THERE'S GOOD NEWS!! Although I have no idea what lies behind the SHO fenders (sorry guys) the XSport has LOADS of room in front of the wheel wells and behind the front bumper. Originally, I wanted to stay nearest the PCV as I could...and that would be the passenger's side. However, with the washer fluid reservoir occupying part of my real-estate, I started examining my driver's side options.

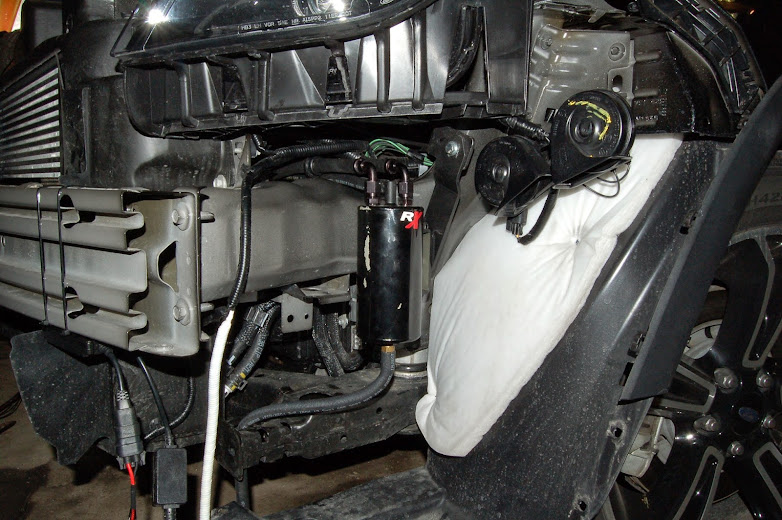
After removing the catch can from it's previously mounted home, I dismantled the mounting bracket, and started test-fitting my alternatives. Similarly to the top-side mounting endeavor, I found a vacant mounting tab, again with the perfect size mounting hole already drilled in it. Using only the provided mounting bracket, I was able to align the can perfectly upright, and at the correct height.

I took avid mental notes prior to moving the bumper regarding clearance and access issues from underneath. The original ford plans must have had an Rx can drawn up and removed at the last second because yet again there was a perfect drain hose/valve option to be had. I am terribly happy with the new layout, and while you can get the gist of things from the pic below, I'll explain how it all worked out...ENJOY!

lnX2rac8NwfDHQl4GYGHFgRs5-iLL_6pz6_x31xcNeY=w782-h520-no


First off; while test-fitting the engine cover after the original mounting, it made a bit of a rub on the can...resulting in a bit of a peel-off-scar down the side of the can. I'll consider re-painting / powder coating later. So for now, please forgive the greasy fingerprints and franken-can. ;)
DSC_0253.JPG


Step 1: Prior to mounting the can in front of the wheel, remove the valve from the bottom of the can
DSC_0258.JPG


While you have it in your hand; this is the perfect time to rebuild the valve and can. I used some teflon pipe tape...may not be necessary, but it made me feel better.
Take one of the threaded hose barbs and thread it in to the bottom of the catch can.
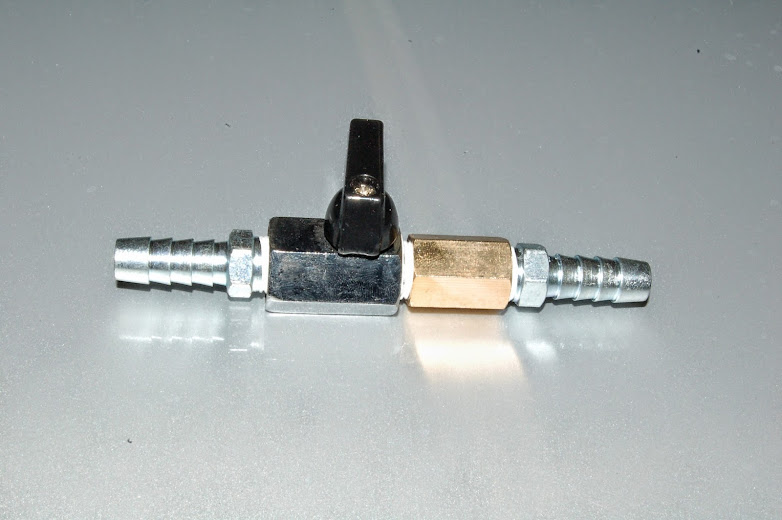
For rebuilding the valve:
Attach one of the threaded hose barbs to (what will be) the bottom of the valve .
Attach the double female connector to the top of the valve, and the last threaded hose barb to the top of it.
DSC_0269.JPG


Tighten with a wrench:
DSC_0270.JPG


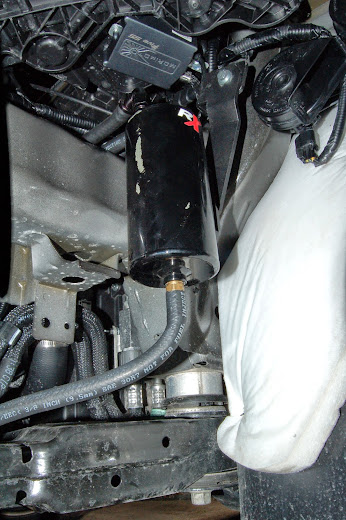
Now you can mount your catch can. You should find an existing mounting tab with a pre-drilled hole. You can manipulate your bracket as such and mount the bracket as low on the can as possible. Use the upper two holes on the can, and slide the can as low as possible within the bracket. As you can see, you're doing this for the purpose of hose-alignment.
DSC_0256.JPG


You will be feeding the hoses through either from can, or engine side (either way). If you look from the outside, you can see a visible channel that runs underneath the stock air box, and above the frame. You will run one line at a time underneath the airbox.
DSC_0260.JPG


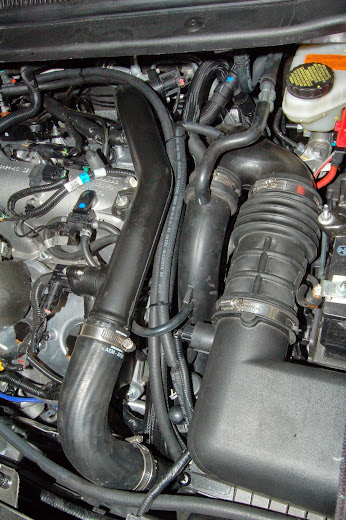
Once they have been run through the channel, they will turn upwards, and follow the intake pipes / charge pipes to the rear of the engine. If you already have the hole drilled / tapped in the front intake pipe, you can leave it as is. If you're installing for the first time, there is no need to drill the front pipe as you can attach the hose to the vacant vacuum barb on the intake pipe (shown here as “capped off”). Also, regarding the rear intake pipe: If you are installing for the first time, I recommend installing a 90* elbow in the hose, after attaching hose to the fitting that's been tapped into the rear pipe. This takes the pressure off the fitting, and makes for a cleaner install than just bending the pipe. If you're already installed (like I was), it's just as simple to cut the hose and install the elbow.
So, you now have three lines, all running together from the catch can.
Outside fitting #1 - Runs to the front intake pipe fitting or vacuum barb, and rear intake pipe fitting. This is a source of vacuum for the can.
DSC_0263.JPG


Outside fitting #2 - Runs to the vacuum barb on the Intake Manifold.
Center elbow fitting - Runs to the PCV vacuum barb located on the rear valve cover.
Both are visible in this picture. Also, I found that it gave me a much better angle off the IM vacuum barb to replace this connector with the 120* connector that was left over from the CSS install, rather than the 90* connector that was originally there. This allowed me to run my line directly back towards the PCV and zip tie them together.
DSC_0262.JPG


As for the remote drain:
attach a length of your 3/8” hose to the bottom of the catch can.
DSC_0257.JPG


You should now be able to locate the frame extension as indicated below. Towards the front of the frame extension there is a 1/2” hole that already exists, and runs straight through to the bottom of the frame extension. You will run your hose through this hole.
DSC_0253.JPG


Now, here is where the choice of hardware used to rebuild the valve becomes important. On the top side of the valve, you could have used a threaded female to hose barb connector, rather than the coupling like I indicated...this would have saved you some space. But, for this particular mounting, I found it to be easier to manipulate the valve when it was spaced away from the frame extension. The coupling is large enough that it does not fit through the hole, so with the addition of a zip-tie, makes for a VERY sturdy and easily accessible mounting location. I added the probably unnecessary 3/8” rubber nipple just to keep any crud out of the lower hose barb. As you can see, there's plenty of room that leaves it still quite tucked away behind the skirt.
DSC_0275.JPG


Congratulations! You have now successfully completed the install!...or re-route!...either way congrats.
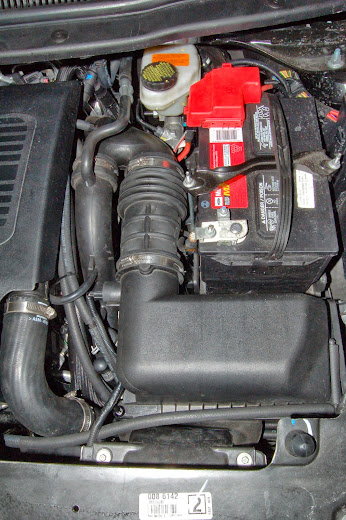
This is what you should see under your hood.
DSC_0261.JPG


With the can now re-routed completely out of the engine bay, your engine cover should fit back on without a problem. Since all of your hoses are tucked down neatly between the charge pipe and intake pipe.
DSC_0265.JPG


Looks almost stock if not for the CSS.
DSC_0264.JPG


p9FW5bOP-OrbJgX07VX8lzrCr_6KkcvNuZDGR86NJN4=w782-h520-no


Why, other than a cleaner looking install did we do this?
Well, the main benefit is to mount it somewhere outside of the engine compartment where it will remain cooler, thus enhancing the condensation /collection effects of the can.

As usual...with any questions / comments / concerns...please don't hesitate to ask!
 
It really wasn't that bad. If you were to install the system this way originally, rather than having to re-route it, the only extra time would be to remove the bumper...which took about a half hour.

All together, to completely re-route the system, with test fitting and experimentation accounted for, stopping to take pictures, a very unnecessary half hour spent trying to fish out an elbow I dropped (I just couldn't let it win), plus including the installation of HID fog lights while I had the bumper off, and a run to the hardware store for fittings and elbows... I would say I still spent less than 5 hours from start to finish.
 
Hey Jimi, you're not gonna be in SoCal anytime soon are ya? ;D  Meh, didnt think so. I've been working on other project cars and the DD Esport has been last on the list. Just gotta dig into it using your install pics and tips.

By any chance did you notice while you had the front end off if there was a plastic 'guard' blocking airflow to the intercooler? Im still not certain if that piece rumored to 'increase IC temps' in an effort to cure the moisture injestion really exists?  If I find it there durning the catch can install it will certainly be coming off...
 
QuickSilver said:
By any chance did you notice while you had the front end off if there was a plastic 'guard' blocking airflow to the intercooler? Im still not certain if that piece rumored to 'increase IC temps' in an effort to cure the moisture injestion really exists?  If I find it there during the catch can install it will certainly be coming off...

First I'm hearing of this one...so I can't say I was really looking for it...I didn't notice anything really stand out as "why is that there?". Just saw an interior bumper assembly, air dams to keep pressure on the CAC and RAD, and the back side of a grill that made me consider getting out my dremel.
...seriously, the thing's got a HUGE grill on it, and it's only actually open for these two small strips down the middle. I'm sure there has to be a reason why they don't want a massive amount of air flowing through the coolers, but I can't fathom why. Even the mesh patterned grill (without bars) that was found on some interceptor somewhere, had a ridiculous amount of backing behind it...completely defeating the purpose. (rant over (for now)) You'll have to let us know what you find!

I was under there this afternoon tweaking the HID fogs and cleaning up some wire-clutter, and I got to thinking...since we have so much room in front of that wheel...I wonder if a "Monster Can" would fit now? Pretty sure the only reason Tracy recommended against it was due to fitment issues...
 
Just a quick update on a couple things:
First the Teflon pipe tape on the valve fittings is not optional. Ended up with a small leak from not having enough tape. Make sure to wrap each fitting 3-4x.

Also, I had the cover off my airbox today. The k&n panel filter, air box, and the inside of all fittings are still home dry. No oil or residue anywhere after moving the CSS line.

That is all... :D
 
JimiJak said:
QuickSilver said:
By any chance did you notice while you had the front end off if there was a plastic 'guard' blocking airflow to the intercooler? Im still not certain if that piece rumored to 'increase IC temps' in an effort to cure the moisture injestion really exists?  If I find it there during the catch can install it will certainly be coming off...

First I'm hearing of this one...so I can't say I was really looking for it...I didn't notice anything really stand out as "why is that there?". Just saw an interior bumper assembly, air dams to keep pressure on the CAC and RAD, and the back side of a grill that made me consider getting out my dremel.
...seriously, the thing's got a HUGE grill on it, and it's only actually open for these two small strips down the middle. I'm sure there has to be a reason why they don't want a massive amount of air flowing through the coolers, but I can't fathom why. Even the mesh patterned grill (without bars) that was found on some interceptor somewhere, had a ridiculous amount of backing behind it...completely defeating the purpose. (rant over (for now)) You'll have to let us know what you find!

I was under there this afternoon tweaking the HID fogs and cleaning up some wire-clutter, and I got to thinking...since we have so much room in front of that wheel...I wonder if a "Monster Can" would fit now? Pretty sure the only reason Tracy recommended against it was due to fitment issues...

Correct!!  The Monster is the best period, but fitment is difficult, so if you can fit it, do it!
 
Back
Top