You are using an out of date browser. It may not display this or other websites correctly.
You should upgrade or use an alternative browser.
You should upgrade or use an alternative browser.
2013 SHO Lamin-X Tints and LED conversion
- Thread starter BiGMaC
- Start date
Darkside said:Looking good! I'm curious to what your opinion will be with the headlights. I flat out LOVE the look during the day, but less than thrilled at night. If you live in a fairly lit area I think they are fine. I find myself driving around in dark areas with my brights on. They will cut down the light because I've yet to be flashed driving with the brights on. My windshield is also tinted so that isn't helping me any either.
Darkside said:Mac, I went from having above factory lights to shitty ones. Luckily I drive most of the time during daylight. If it didn't look so good I would tear them off.
You know, as I studied the car and pondered your experience, I noticed that most of the appearance inside the headlight cowl is black anyway....... so last night I decided to hold off on tinting the heads, at least until I've got the LEDs finished. No problems with the tails driving last night, but i don't want to be blind at night. May buy a couple of sheets of the gunsmoke and just tape them in place (adhesive side out) to see about light transmission. Thanks for the input!
I will be working on a few small bubbles in the Lamin-X tails today. It is also worth noting that the injection nipples and DOT cert numbers are on the inside of the headlights cowls... BUT are on the outside of tail light lenses. This causes some surface irregularity where the film cannot completely adhere.
Currently I love the look... drove to the dealer to get the wife's truck last night and several salesman were admiring them and very complimentary on the look. ( also showed it to a couple of BIMI 5s at stop lights going home... LOL) If I decide to stay with these I'll remove the ones I have now, sand off the nipples, polish the lenses again, and reapply the film to a completely smooth surface. I should have know and done it first anyway.
Pics below taken 36 hours after application of the Lamin-X
Front headlight is mostly black.

Here's an injection nipple and lifted film due to it.

Overall the job still Looks acceptable,,at least for a trial (The wife's truck in the background... Christmas decoration! Yea, we like black cars, LOL)


More to follow after a few decisions and the last of the LEDs to the front lighting.
OK!... vLED shipped yesterday and told me Tuesday.... I paid for routine and they sent it overnite! :icon_arrow: Service! :thumb: They arrived today!... :banana: Just opened the box. Gonna be a late nite tonite! :mj_banana:
Here they are. They are huge with a large heat sink attached. So I'm better than back on schedule now.
Here they are. They are huge with a large heat sink attached. So I'm better than back on schedule now.

D
DJE624
Guest
Be careful with those bubbles. A lot of them take care of themselves. Ask MJH about the best way to deal with them. When I took the film off my headlights that time there was actually a water bubble a few days later. I could have sworn when I finished putting the tint on, there was not one bubble anywhere. I think the molecules might attract each other through capillary action. Maybe the same with air. Those darn bubbles seem to appear from nowhere.
DJE624 said:Be careful with those bubbles. A lot of them take care of themselves. Ask MJH about the best way to deal with them. When I took the film off my headlights that time there was actually a water bubble a few days later. I could have sworn when I finished putting the tint on, there was not one bubble anywhere. I think the molecules might attract each other through capillary action. Maybe the same with air. Those darn bubbles seem to appear from nowhere.
Dave... Thanks, I will... I tried the sewing needle thing... some actually drained water after 36-40 hours,, used heat gently. Not seeing any new ones ...yet...... This is like an experiment. I want it to look good, but if I decide to keep it filmed (and I am loving the appearance more and more) I will remove the tails and coat with a sheet rather than precut to get better coverage and eliminate exposed edges.
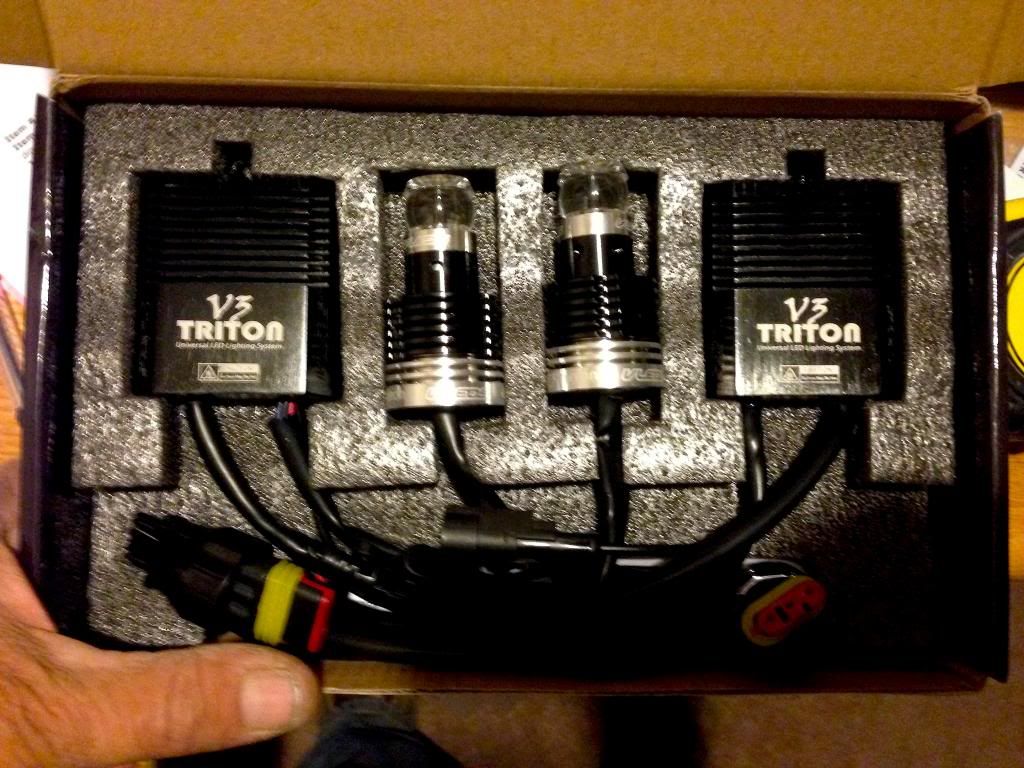
Kbeck.... The required ford adapter (socket for headlight cowl) is in the box (below the foam along with a fist full of wires, connectors, gaskets and seals, etc)..... I'll post more detailed photos later before I install.kbeck59 said:ok .... what about required harness adapters from Ford to install the V3 tritons ..... I'm confused ??
Do you have them ?
Per Kbecks request... and possibly of interest to others... The pic below is the contents of the Triton V3 packaged with labels. left click to enlarge.
It appears to be plug and play. I think access to the drivers side headlight cowl will require removal of the air intake. The resistors are in the control module that have attachment holes for a screw. The 50% reduction light will dim the white part of the switchback when the headlights are on and is optional, but 600 lumen is pretty bright.
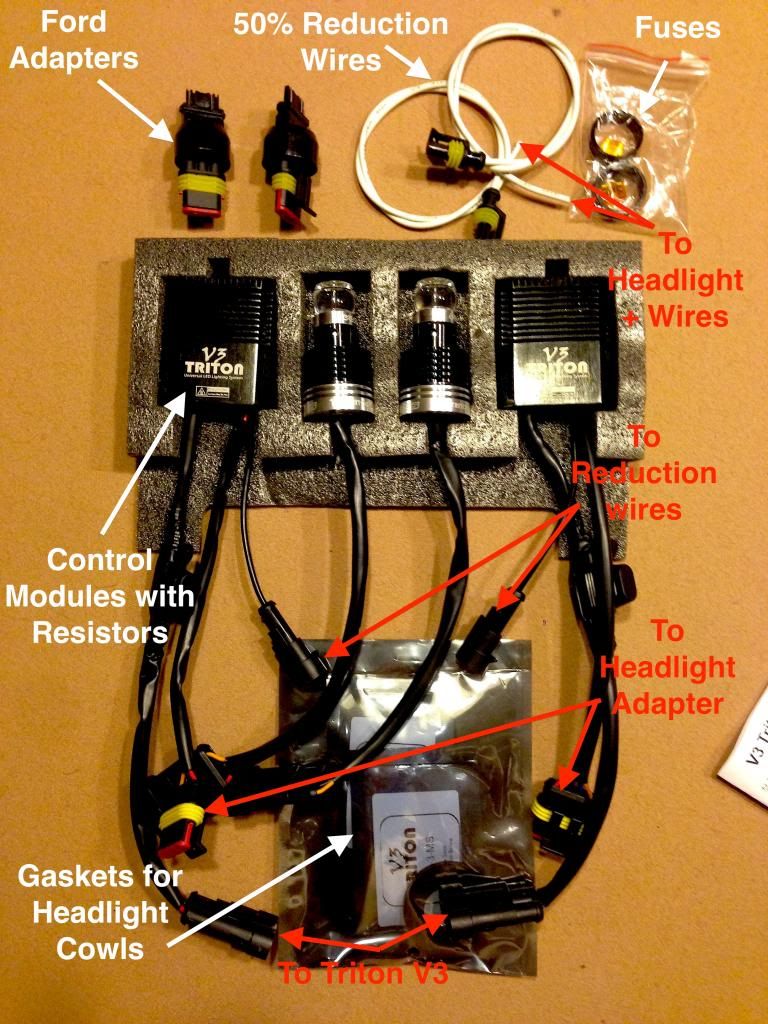
It appears to be plug and play. I think access to the drivers side headlight cowl will require removal of the air intake. The resistors are in the control module that have attachment holes for a screw. The 50% reduction light will dim the white part of the switchback when the headlights are on and is optional, but 600 lumen is pretty bright.

SHOdded said:Serious looking package there. Thanks for the picsDo you already have HID, or do you plan to go HID? I am thinking about how much space you'd have left over in that part of the bay after these Tritons are installed.
Yes, it came OEM with HID from the Ford, and space is a premium!... we'll see later today. The HIDs are white, not bluish, which is why I went with the 5000K color temp.... Thanks to geswek for that temp match info.
Help Please. :help2:
Well I'm still studying the 2013 SHO for access to the side-markers from inside the engine compartment... so far I can't even see them either side. I think I can feel the one on the passenger side..... they are just lateral to the HID housing. The manual is no help. Don't know WTF Ford was thinking. :hmmm:
So I'm throwing out this question: What is the best way to access the front side-marker on a 2013 SHO? :dunno:
I figure I'm gonna have to do some R&R of parts of the car, but I don't want to take the bumper off only to find that I can't get to the bulbs/back of the headlight housing.
Anyone?
I wasn't going to do a "how to" on this..... maybe I should once it's all figured out.
D
DJE624
Guest
When I swapped my headlights, I had to take the bumper cover off. If you pull out the head light assembly you will have access to the side markers. It's a pain but not too difficult. The worst part is getting those "arrowhead" screws out where the bumper cover meets the fender. At least it's like that on a 10-12. Your results may vary.
Thanks Dave. I'm still studying it, but don't see another way now. :crybabysmiley: The bright side is that I can get to the turn signals for the switchbacks pretty easy...but the side markers, wow! Gonna read bpd's how-to on that.
What was the Ford engineer who designed this deal thinking about? $2 bulb... R&R required $200, at: still... Maybe I can get the dealer to do the side-markers... You know I'm lazy. :rofl:
What was the Ford engineer who designed this deal thinking about? $2 bulb... R&R required $200,
at: still... Maybe I can get the dealer to do the side-markers... You know I'm lazy. :rofl:
D
DJE624
Guest
Actually, after you pull the bumper cover off and replace it a couple times, it's not really that difficult. Just a big pain. And it does put a lot of wear and tear on the fastening system.
dalum said:You can also get to them through the inner fender well. I don't know if you can just turn the wheel and remove the front few screws or if you have to take off the wheel and/or whole thing.
Have you decided where to tap for the dimmer wire yet?
Not yet... I may wire them first without and see if I get flashed ...but you're right, Thanks. I should decide and leave a tail to tap if/when I need the dimming function... Any ideas on the best place to attached the dimmer?
Going out to lift the car now and remove the lower engine shield to see if I can get access that way.. I can change the side-markers by feel if I can just get to them ...I thought the switchbacks would be the hard part... NOT!
I ordered my V3 Tritons several months ago , As stated by Dalum earlier in this thread he said he could not get either version 1 or 2 to work on his 13 SHO . Evidently this has become a known issue to VLeds since they have come out with a revised socket Adapter to solve the problem .. I guess I need to call them and have them send me the new socket adapter.... Hopefully they will provided them to me for free since mine was order prior to this being known as an issue ....
kbeck59 said:I ordered my V3 Tritons several months ago , As stated by Dalum earlier in this thread he said he could not get either version 1 or 2 to work on his 13 SHO . Evidently this has become a known issue to VLeds since they have come out with a revised socket Adapter to solve the problem .. I guess I need to call them and have them send me the new socket adapter.... Hopefully they will provided them to me for free since mine was order prior to this being known as an issue ....
Yea... call them! The install was plug and play.. literally! They work super! No problem except finding metal to mount the controller... other than that no directions needed. I'll post pics later after sorting. They are worth every penny. I love the way they look. I did not hook up the headlight wire for the 50% dimming on the white parking/running lites. I thought they were a little too bright, but nobody flashed me.
Do you know of a good point to access the positive headlight wire and what color it is... with the HIDs the wiring is not straight forward.
Pics later, but call vLEDs and get that adapter from my earlier pic... Again, very easy install, and work like a charm
D
DJE624
Guest
Great to hear it Tom! Did you end up pulling the cover?
DJE624 said:Great to hear it Tom! Did you end up pulling the cover?
I wimped out on the side-markers... :chair: so no.... but by removing the factory CAI I had plenty of room to install the switchbacks. :bangin: They are pretty incredible at 600 lumens!... :dude: ...wondering what the 800 lumen puddle lights will be like.... and still thinking about finding the Headlight hot and reducing the running/parking (white part) to 300 lumen.
Anyway gotta feed the horses and then sort the pics of install and results.. will post later tonight.
Similar threads
- Replies
- 65
- Views
- 30K
- Replies
- 2
- Views
- 6K
- Replies
- 10
- Views
- 12K